Even if you’re running around, chasing kids, chasing the dog, or chasing your tail in a never ending quest to ‘get things done,’ there comes a time in every parent’s life when boredom can set in. For me, that comes in the winter when I struggle for new activities, new places to go, and new things to see for both myself and my 4 kids.
This winter, I discovered a new way to beat boredom. And it’s a way you’ll see many other Moms and Dads entertaining themselves if you browse websites like Pinterest or Ikea Hacks.
I’m talking about refinishing wood furniture, and seriously, this is a fun way to pass the time even if you’re one of those people scared to turn on the power sander.
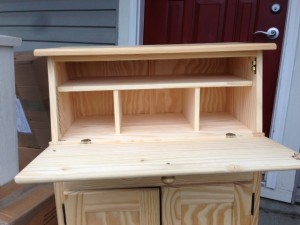
Take this piece for example.

I found this hutch fully built (although I must say whoever did it was probably at the limits of their dedication to the store, because it was completely ‘wobbly’ as my kids would call it). It was priced at $68, which I considered to be a steal considering it’s real wood, has a cute little fold down ‘secretary’ type top, and was totally unfinished so I could do whatever I wanted to it.
I saw something similar to this in Home Sense (or Home Goods for those you blessed to live in the USA) and I wanted it badly. It was blue, with rustic numbers on the top and drawers, and was distressed slightly. For those who know me, I can never resist something that’s vintage, has numbers, and is blue. However, at around $500, it didn’t make sense as a piece for my kitchen.
This hutch however – Now this made sense. So I picked it up and brought it home.
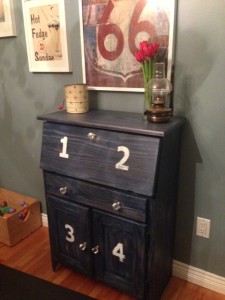
And turned it into this:

Here’s how I did it:
- I gave it a good sanding with my absolute favorite power sander – The Black and Decker Mouse Detail Sander. Oh how I love this sander. It gets into the corners and is so easy to hold.
- After I dusted it off, I wiped it down with a cloth and got out the stain.
- I picked a water-based stain called SamaN, and I choose the color Colbalt. Although upon reflection, I might have picked the Victorian shade had the option been presented, I’m very happy with how it turned out.
- Starting with a pair of rubber gloves and a big, fat sponge I bought at the dollar store, I rubbed straight across in the direction of the wood grain. Then I wiped it down with a cloth.
- I wasn’t going for perfection, I wanted it to look distressed.
- Once the stain was on (it only took one coat), I let it dry for an hour.
- For the numbers, I Googled a stencil of large numbers and printed it out.
- I cut out the stencil on plain paper, then taped it on the hutch.
- I took a brush and white high gloss paint, making the brush as dry as possible. Then I dragged it across the stencil to create an ‘aged’ look.
- Once the white paint had dried, I put on a MiniWax Polyurethane Crystal Coat. As I applied it, I rubbed it off slightly too as I didn’t want it to be too shiny.
- Instead of the standard knobs, I swapped them out for fake crystal knobs. I think it adds a nice touch of class.
That’s it! It was pretty simple, and among the easiest projects I’ve done this winter. My Ikea Hack desk was harder to do than this blue hutch.
And once you’ve refinished one piece, it’s hard not to start noticing the potential in every thrift store shelf or dusty corner of a hardware store. I’ve since started keeping an eye out for other small but impactful furniture projects that offer both style and utility.
One that caught my attention recently was a narrow console table with storage, the kind you might find curated on sites like Sicotas. These slender, purposeful tables are perfect for tight entryways or even the back wall of a living room, offering just enough surface space to play with color or decor, while the hidden storage makes it practical for a busy household.
Whether you’re refinishing a vintage find or hunting for something new with clean lines and function built-in, it’s these thoughtful furniture pieces that help transform a house into a home—especially when you get to say, “I made this mine.”
Someone asked me why I added numbers. As I mentioned above, I like them. Also, they seem to be popping up on shabby chic and rustic pieces all over the place, so why not? And last, but not least, I have four kids. So it just seems to fit.
The Route 66 pic was from Michaels, and the old flour sifter was from my Grandma’s farm. I’m going for whole ‘eau du farmhouse’ thing, and I’m definitely getting there.
Here’s hoping you too can beat boredom this winter by refinishing wood furniture!